
Lawn & Garden
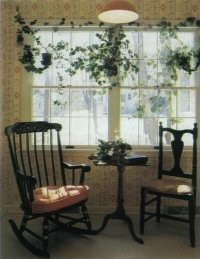 Indoor plants are a beautiful addition to any home. Check out more pictures of house plants here. |
If you want to bring the beauty of nature inside your home, indoor plants are a great option. In this article, we will discuss how to properly care for your indoor plants. We will cover topics such as lighting, watering, humidity, temperature, fertilizing, potting, grooming, propagating, decorating, preventing pests and diseases, and caring for your plants while you’re away.
Studies have shown that people feel more relaxed, productive, and content when they are surrounded by living plants. Taking care of plants can be therapeutic and has positive effects on both physical and mental health. Additionally, indoor plants are known to filter pollutants from the air, making them a healthy addition to any home.
Every year, millions of indoor plants are sold across the country. They are featured in all types of interior design and home decorating magazines. Indoor plants can be found in nurseries, plant stores, supermarkets, and department stores, making them easily accessible to anyone who wants to bring a touch of nature into their home.
The good news is that taking care of indoor plants is not difficult. With some basic knowledge and techniques, anyone can successfully grow indoor plants. Let’s start by learning about lighting for indoor plants in the next section.
Want to learn about specific types of indoor plants? Check out these categories:
- Indoor Plants
- Full Sun Indoor Plants
- Bright Light Indoor Plants
- Filtered Light Indoor Plants
- Low Light Indoor Plants
- Hanging Basket Indoor Plants
- Floor Plant Indoor Plants
- Table Plant Indoor Plants
- Terrarium Plant Indoor Plants
- Easy Indoor Plants
- Difficult Indoor Plants
- Temporary Indoor Plants
- Flowering Indoor Plants
- Climbing or Trailing Indoor Plants
- Indoor Plants with Colorful Foliage
- Fragrant Indoor Plants
- Gardening
Lighting for Indoor Plants
Indoor plants rely on light the same way animals rely on food. They absorb light and turn its energy into the sugars and starches they need to grow and survive. Without adequate light, no plant can thrive.
Fortunately, indoor plants will show signs of inadequate lighting. They will have pale or limp growth and will stretch towards the nearest light source. Flowering may be weak or nonexistent, and the plant may begin to rot as it is unable to use the water it is given without sufficient light.
 Southern exposures receive full sun from late morning to mid-afternoon. |
The lighting needs of different indoor plants will vary. A dark corner may be fine for a foliage plant, but a flowering plant may need more light. As long as there is enough light to read by, some indoor plants can thrive in any condition.
Changes in Light Throughout the Year
The intensity of light changes with the seasons, and it’s important to adjust the placement of your house plants accordingly. During the winter months, a south-facing window provides the best location for most house plants, while during the summer it’s best to move plants away from hot south or west windows or use sheer curtains to protect them from the intense sun. A north-facing window may not provide enough light for flowering plants in winter, but it’s perfect for keeping house plants cool and healthy during the summer. Don’t hesitate to move your plants around as the seasons change.
Improving Natural Light
If you notice your house plants aren’t getting enough light, there are ways to improve the situation. Remove anything that blocks the path of light, such as curtains, blinds, or outdoor foliage, and regularly clean your windows. Painting nearby walls and furniture in light colors can also help reflect light back onto your plants.
Using Artificial Light
Your house plants can do well under artificial light, but it’s important to choose the right type of bulb. Incandescent bulbs produce low-quality light that can result in weak, unhealthy plants, while fluorescent lights and halogen lamps provide light that’s similar in quality to natural sunlight. Use a timer to ensure your plants receive 12-14 hours of light per day and keep the lamp at a safe distance to prevent overheating.
|
Window by Window The amount of light your windows receive can vary, so it’s important to choose the right spot for each plant.
|
In the next section, we’ll discuss how to properly water your house plants.
Want to learn more about specific types of house plants? Check out these resources:
The list includes various types of house plants such as those that prefer full sun, bright light, filtered light, light shade, hanging baskets, floor plants, table plants, terrarium plants, and those that are very easy, easy, demanding, temporary, flowering, climbing or trailing, with colorful foliage, and fragrant. In terms of watering, most house plants prefer their soil to be evenly moist, not too wet or dry, while some prefer their soil to dry out completely between waterings. It is important to water thoroughly and wait until the plant needs water again before watering. Tap water can be used or water can be left overnight before using. Rainwater is often the best choice for areas with hard or artificially softened water. Checking a plant every two to three days and using methods like soil color, feeling the soil, or lifting the pot can help determine when to water. Watering can be done from above or below, but it is important to ensure that the pot has soaked up enough water and excess water is poured out.
If you have house plants that need to be kept moist all the time, wicking can help. All you need is a water reservoir like an old margarine container and a piece of yarn. Insert one end of the yarn into the potting mix and push it down into a drainage hole with a knitting needle. Make a hole in the lid of the reservoir and insert the other end of the yarn. Water the pot from the top to let water soak through the wick. After that, the plant will absorb water through the wick, so keep the reservoir filled with water or fertilizer solution at all times. This method is perfect for those who are often away since wick-watered plants can go weeks without water. A capillary mat can also be used by cutting it to fit the saucer or tray and keeping it moist. Read on to learn about humidity for house plants.
Most plants require humid air to grow well. Leaves lose moisture when the air is dry, which can’t always be replaced through the roots’ water absorption. Thin leaves need more humidity, while thick, leathery, or waxy leaves are less susceptible to dry air. Curled leaves, dry leaf tips, and frequent watering are signs of dry air, and flower buds may turn brown or fall off. Humidity levels in most homes are below 30%, but most house plants need at least 40%, and some require 60% or more. A relative humidity of 50-60% is ideal for both plants and people. Regional and seasonal variations may also affect humidity levels.
Dry air can be a persistent issue in some parts of the United States, particularly in the arid Southwest. When the weather is very hot, air conditioning can exacerbate the problem by drying out the air even more. In such regions, a humidifier may be necessary year-round.
In areas with cold winters, the humidity levels indoors tend to drop during the heating season. This is because the relative humidity of cold outdoor air decreases when it is warmed up. Certain types of heating systems, such as electric heat, can worsen the situation by further reducing humidity levels in the air. In such cases, it may be necessary to use a system that can help increase humidity during the winter months.
Air Circulation
Plants that grow outside are exposed to various types of air currents, and many of them seem to require a certain amount of air movement indoors as well. Air circulation helps to remove waste gases, excess heat, and prevent the development of diseases that can occur in enclosed spaces. There is usually sufficient air circulation near large windows due to temperature differences between day and night, but in other areas, especially near plant lights, it is advisable to use a small fan to keep the air moving constantly. However, the fan should not be directed at the plants; just having it in the same room will provide the necessary circulation.
Simple Ways to Increase Humidity
The most well-known method of increasing air humidity is to spray houseplants with warm water. Unfortunately, this is not particularly effective, as the humidity provided dissipates quickly. To efficiently increase humidity through spraying, the process should be repeated several times a day.
A room humidifier is a great way to increase air humidity. However, it is important to remember to refill it regularly. Some modern homes have built-in humidifiers that can be adjusted to the desired level.
You can easily create your own plant humidifier. Simply fill a waterproof tray with stones, gravel, or perlite and pour water over them so that the bottom layer is submerged in water while the upper layer remains dry. Place your plants on one of these pebble trays, and they will benefit from the added humidity as the water evaporates. By keeping the tray constantly half-filled with water, a nicely humid microclimate will be created.
For house plants that require moderate humidity levels, grouping them together during the heating season is a simple solution. Each plant gives off humidity through transpiration, and clusters of plants will create a very humid atmosphere in the surrounding air.
Terrariums
Delicate house plants with thin leaves require a humidity level of over 70 percent, which can be difficult to maintain in a large room. If it is impossible to maintain this level of humidity, a terrarium made from an old aquarium can be the best solution. When fitted with a glass lid, it creates a microclimate where humidity levels rise to almost 100 percent. Simply open it slightly for ventilation if water droplets begin to form.
In the next section, we will discuss temperature for house plants.
Want to learn about house plants by type? Try these:
The article provides a list of various types of house plants, including those that thrive in full sun, bright light, filtered light, light shade, hanging baskets, floor plants, table plants, terrariums, and those that are very easy, easy, demanding, temporary, flowering, climbing or trailing, colorful, and fragrant. The article then discusses the ideal temperature range for house plants, which is similar to the temperatures found in tropical/subtropical climates. Daytime temperatures ranging from 65° to 75°F (18° to 24°C) are ideal, and occasional summertime highs up to 90°F (32°C) are generally tolerable. The article recommends keeping nighttime temperatures cooler (dropping 5° to 10°F or 3° to 5°C) to promote healthier growth and conserve energy. The article also suggests ways to cool down house plants during long periods of extreme heat, such as increasing ventilation, using air conditioning (but avoiding direct drafts), and increasing humidity in dry climates. Finally, the article lists other types of house plants for readers to explore.
Fertilizing House Plants
Feeding and fertilizing are not the same things for plants. Light is the primary source of energy for plants and not fertilizers. Fertilizing can cause more damage than good if the plant is not growing well and if good light levels are not supplied. New house plants or those that have been repotted require a few months’ rest from fertilizing so that they can use up the nutrients already present in their growing mix.
For healthy growth, plants require three major elements namely nitrogen (N), phosphorus (P), and potassium (K). These elements are always listed on fertilizer labels in ratios such as 6-12-4. This indicates 6 percent nitrogen, 12 percent phosphorus, and 4 percent potassium. Fertilizers also contain minor elements such as magnesium, iron, and boron that plants need for growth.
Fertilizers rich in nitrogen (the first number) stimulates healthy foliage growth, while those rich in phosphorus (the second number) encourages root development and improved flowering. Those rich in potassium (the third number) will help build up reserves for plants that have a dormant period. For foliage house plants, 30-20-20 fertilizer is recommended, while flowering house plants prefer 15-30-15 fertilizer that is richer in phosphorus.
Most plants are grown in soilless potting mixes that offer very little in the way of nutrients. Therefore, regular fertilizing is essential. A constant feed method can be used by taking a liquid or water-soluble fertilizer designed for monthly application and reducing its dosage by four. For example, if the label states it should be applied once a month at a rate of one teaspoon per gallon, apply it at every watering at a rate of ¼ teaspoon per gallon.
Ready-to-use liquid fertilizers are convenient but expensive since you pay for the water they contain. Water-soluble fertilizers, available in powder or crystal forms, are just as efficient but more economical because you add the water yourself. Slow-release fertilizers are also available in granule form to be mixed with the soil or in spikes and tablets that are pushed into the potting mix. They only need to be applied once every few months.
Both organic and chemical fertilizers are available in a wide variety of concentrations. Since chemical fertilizers applied to house plants do not leach out into the outside environment, even growers who use only organic fertilizers outdoors often have no qualms about using chemical ones on their indoor plants.
Liquid seaweed is a popular organic fertilizer that is sprayed onto plant leaves. For house plant care, expensive gardening equipment is not necessary. Basic kitchen utensils such as a spoon, scissors, and a sharp knife can be used, along with a narrow-spouted watering can. The next section discusses potting house plants. There are various types of house plants, including those that require full sun or bright light, and those with colorful foliage or fragrant blooms. House plants need to be repotted at least once a year, or more frequently for fast-growing plants. Signs that a plant needs repotting include wilting shortly after watering, tipping over, or a build-up of mineral salts. For plants that are difficult to repot, top-dressing with new potting mix can help remove toxic mineral salts. When repotting, gently remove up to one third of the original potting mix and trim any dead or damaged roots. Choose a clean pot no more than one or two sizes larger than the previous one, and fill with growing mix. Finally, water the plant thoroughly to help it adjust to its new home.
After repotting, it’s recommended to keep house plants away from direct sunlight for a couple of weeks.
Hydroculture
Healthy growth for house plants doesn’t require soil, as long as their roots receive enough oxygen and moisture. Hydroculture uses water and an inert medium like clay pellets or pebbles as an anchor. A water level indicator determines when to add water, which is usually only necessary every few weeks. Nutrients come in the form of slow-release pellets or tablets. It’s easier to start plants from cuttings, but rooted plants can also be transferred to hydroculture by rinsing their roots thoroughly of all soil. Hydroculture kits are available for any plant size.
The Right Pot for the Job
Plastic pots and other non-porous containers dry out slowly and work best for house plants that prefer evenly moist soil. Clay pots are better for plants that prefer drier soil, as they allow water to evaporate and prevent overwatering. All pots should have drainage holes to remove excess water. Decorative pots without drainage holes can be used as outside containers only.
Potting Mixes for House Plants
Most house plants grow well in all-purpose potting mixes made of peat moss, vermiculite, and perlite in varying proportions. These soilless mixes are lightweight and well-aerated, yet retain moisture for optimal plant growth. Caladiums, Boston ferns, asparagus ferns, and many other plants prefer this type of mix. Soil-based mixes are heavier and drain more quickly, making them ideal for cacti and succulents. Epiphyte mixes such as sphagnum moss and bark chips are perfect for certain indoor plants like cattleya orchids and Venus’s fly-traps. These plants require very well-aerated mixes.
In the next section, we’ll discuss house plant temperature.
Want to learn about house plants by type? Try these:
- House Plants
- Full Sun House Plants
- Bright Light House Plants
- Filtered Light House Plants
- Light Shade House Plants
- Hanging Basket House Plants
- Floor Plant House Plants
- Table Plant House Plants
- Terrarium Plant House Plants
- Very Easy House Plants
- Easy House Plants
- Demanding House Plants
- Temporary House Plants
- Flowering House Plants
- Climbing or Trailing House Plants
- House Plants with Colorful Foliage
- Fragrant House Plants
- Gardening
Grooming House Plants
Basic plant care often overlooks simple grooming, which can make a huge difference in the appearance of house plants. Here are some tips to transform an unattractive plant into a stunning one.
The Quarter Turn
|
|
Plants have a natural tendency to grow towards light, which can cause them to become lopsided or fall over if they are not rotated periodically. To prevent this, give your plant a quarter turn each time you water it so that it receives light from all angles and remains symmetrical.
Cleaning House Plants
Removing dead or yellowing plant parts is essential for maintaining the plant’s appearance and preventing pests and diseases from spreading. Use scissors to trim off dying leaves and flowers, and to cut brown leaf tips to a natural point. To prevent dust and grease buildup, wipe the leaves once or twice a year with a soft cloth dipped in soapy water or rinse them under a warm shower or during a rainstorm.
Pruning House Plants
Pruning unattractive sections of a house plant can make it look fuller than ever. Soft new growth can be pinched between your thumb and forefinger to promote branching without leaving a noticeable stub. Properly pruned and rotated house plants rarely need staking, but if one has grown too tall to support itself, use an unobtrusive stake to prop it up.
Propagating House Plants
Many house plant enthusiasts enjoy multiplying their plants for personal use or as gifts. While not all methods apply to every plant, most can be propagated in one way or another. Stem cuttings are a common method.
The most popular plant propagation method is through stem cuttings, which can be applied to any plant with visible stems. To do this, select a healthy section of stem with at least three nodes and cut it cleanly with a sharp knife just below the lowest node. Remember to remove any flowers or leaves growing from the bottom node. Applying rooting hormone to the cut section can help stimulate faster rooting. While rooting can be done in water, it is recommended to use a pasteurized rooting mix such as soilless growing media, vermiculite, sand, or perlite. After filling a container with mix and moistening it lightly, use a pencil to prepare a hole for the stem and insert the cutting, making sure at least one node is covered with mix. Cover the container with a clear plastic bag to maintain high humidity and keep the young cutting from wilting. Once the plant is well-rooted and growing on its own, remove the plastic and care for it like an adult plant. Succulent and cactus cuttings should be allowed to heal over before being potted. Leaf cuttings are only suitable for a few plants, but they are easy to propagate. Break off a whole leaf, including its stalk, and insert the stalk into the rooting medium, covering the container with clear plastic. Plantlets will soon sprout at the leaf’s base. For a few plants, even a small leaf section can be rooted. Layering is another propagation method.
This article describes various methods for propagating house plants. Trailing plants or those that produce baby plants on stolons can be propagated by pinning a section of stem to moist growing mix until it roots, then cutting it free and growing it on its own. Examples of plants that can be propagated this way include hare’s foot ferns, episcias, pothos, Boston ferns, and strawberry begonias.
Air layering is used for trees or shrublike plants with thick or woody stems that are hard to root from stem cuttings. To air layer a plant, make a cut halfway through the main stem, insert a sliver of wood or a match to prevent healing, apply rooting compound, cover with moist sphagnum moss, wrap in plastic, and check weekly until roots have formed. Then pot the new plant in an individual pot and treat it as an adult plant.
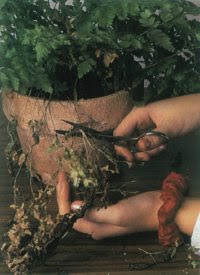
Plants that grow in clumps are best propagated by division. To do this, remove the plant from its pot and break the rootball up into sections, each with at least one rooted stem, then plant the divisions in individual pots.
Offsets, or baby plants at the base of the mother plant, can be cut free when they are about one third of their size. If not yet rooted, treat them as cuttings.
Almost all house plants can be grown from seed, although they may be hard to come by. Sprinkle the seeds over a moist growing medium, press lightly, cover with plastic or glass, and place in a warm, brightly lit spot. When plantlets appear and have formed at least four true leaves, harden them off and pot them individually in small pots. Examples of plants easily propagated by seed include asparagus ferns, begonias, primroses, and parlor palms.
The article concludes by directing readers to other articles about house plants by type.
The original text:
- House Plants
- Full Sun House Plants
- Bright Light House Plants
- Filtered Light House Plants
- Light Shade House Plants
- Hanging Basket House Plants
- Floor Plant House Plants
- Table Plant House Plants
- Terrarium Plant House Plants
- Very Easy House Plants
- Easy House Plants
- Demanding House Plants
- Temporary House Plants
- Flowering House Plants
- Climbing or Trailing House Plants
- House Plants with Colorful Foliage
- Fragrant House Plants
- Gardening
Decorating with House Plants
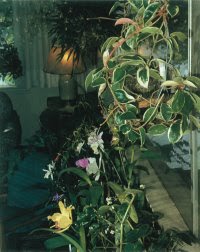
The real value of house plants is in their ability to be used as decorative items in the home. They create a cozy and comfortable atmosphere for people. When used correctly, they can make large spaces feel intimate and small spaces appear more spacious. It is hard to imagine a home decor without at least a few house plants placed in strategic locations.
|
|
Movable House Plants
Although a plant may look good in a certain spot, it may not always thrive there, usually due to a lack of light. Rather than installing artificial lights to improve conditions, it is easier to consider house plants as movable objects. For every shady spot that needs greenery, purchase two plants. While one plant serves as a decorative item, place the other in a brightly lit window. Switch the plants around once a week to keep them healthy and attractive for a longer period.
Flowering house plants require more light than foliage types and are often only able to grow directly in front of a window. They can, however, be used as decorative items while in bloom and placed anywhere in the home. Once they stop blooming, move them back into the light until they have recuperated enough to bloom again.
Dish Gardens and Terrariums
It is easy to create fascinating miniature gardens in small containers. Just mix small foliage plants with the occasional flowering plant in a decorative dish garden, or create one entirely composed of cacti and succulents. Trailing and bushy plants mixed with an upright one for contrast will create an especially decorative effect. Use glass terrariums instead of trays for delicate plants. If the container is deep enough, leave the plants in their pots and hide them in decorative mulch. This way, any unattractive plants can be easily replaced without disturbing the others.
Continue reading to learn about preventing pests and diseases in house plants.
Looking to learn more about house plants by type? Check out these:
The rephrased text:
This article features a list of different types of house plants, including Full Sun, Bright Light, Filtered Light, Light Shade, Hanging Basket, Floor Plant, Table Plant, Terrarium, Very Easy, Easy, Demanding, Temporary, Flowering, Climbing or Trailing, House Plants with Colorful Foliage, Fragrant, and Gardening. However, the real value of house plants is in their use as decorative items in the home. They create a cozy and comfortable atmosphere for people and can make large spaces feel intimate and small spaces appear more spacious. It is hard to imagine a home decor without at least a few house plants placed in strategic locations. House plants are movable objects that can be switched around to keep them healthy and attractive for a longer period. Flowering house plants require more light than foliage types and can be used as decorative items when in bloom. Miniature gardens can easily be created in small containers by mixing small foliage plants and flowering plants. Glass terrariums can be used for delicate plants, and unattractive plants can be easily replaced without disturbing the others.
The list includes various types of house plants categorized by their light requirements, such as full sun, bright light, and filtered light. There are also categories based on the level of care required, such as very easy, easy, and demanding plants. Additionally, there are categories for flowering plants, climbing or trailing plants, and plants with colorful foliage. The article then focuses on preventing pests and diseases in house plants by identifying and treating plant symptoms caused by cultural practices. It also advises using appropriate pesticides and organic alternatives to avoid harming the plants or the home’s inhabitants. A chart is provided for both cultural problems and pest-related problems.
The article discusses various pests that can affect indoor plants. A table is provided, listing the symptoms, causes and treatments for each type of pest. Spider mites, mealybugs, scale insects, aphids, whiteflies and thrips are some of the common pests discussed. The article also mentions a problem caused by cyclamen mites that affects specific plants like African violets, begonias and cyclamens. The article concludes by stating that plant conditions can also be caused by diseases and provides a chart to help identify symptoms and treatments.
The article discusses various diseases that can affect house plants, their symptoms, causes, and treatments. White and gray molds can appear on leaves and flowers, causing yellowing and death of plant parts. Leaf spots can cause yellow, brown, or black spots on leaf surfaces, which spread until the entire leaf dies. Root or stem rot can cause black patches at the base of the stem or underground, and the plant may wilt and not recover even when watered. The article recommends improving air circulation, avoiding moistening foliage during watering, and using appropriate fungicides to treat these diseases.
To avoid insect and disease problems, the article suggests using pasteurized potting mixes and isolating new plants carefully after purchase. The final section of the article talks about vacation care for house plants. Some plants, such as cacti and succulents, can go for months without water and are suitable for frequent travelers. Watering systems like wicks, capillary matting, and hydroculture can keep most plants happy for two weeks or longer. Sealed terrariums need the least care and can often go for years without water.
The article also provides last-minute tricks to keep even difficult house plants living during long absences without regular care. Finally, the article offers links to learn about different types of house plants, including those that require full sun, bright light, filtered light, light shade, hanging baskets, floor plants, table plants, terrarium plants, easy or demanding plants, flowering plants, climbing or trailing plants, plants with colorful foliage, and fragrant plants.
To keep your plants alive while you’re away, start by placing them in a shady area and removing any flowers or buds to lower their water requirements. Although plants usually don’t like waterlogged soil, they can tolerate it temporarily, so place them in a deep tray and flood them with water. Most plants can survive for at least three weeks after this treatment. If you have delicate plants, cover them with plastic to prevent evaporation and they can go for over a month without care. Alternatively, you could leave your plants in the care of a knowledgeable neighbor who can water them once or twice a week. If you want to learn more about house plants, try exploring the different types listed on the page. The author, Larry Hodgson, is an experienced garden writer and has written several books on gardening and houseplants in English and French.
FAQ
1. What are some basic tips for caring for house plants?
First and foremost, make sure your plants are getting the right amount of sunlight. Some plants prefer direct sunlight, while others need more shade. Also, be sure to water your plants on a regular schedule and make sure the soil is not too dry or too wet. Fertilize your plants every few months to keep them healthy and thriving. Finally, keep an eye out for pests and diseases, and take action as soon as you notice any problems.
2. How often should I water my house plants?
The frequency of watering your house plants will depend on the type of plant and the conditions in your home. As a general rule, most indoor plants should be watered once a week. However, some plants may need more frequent watering, while others can go longer without water. Always check the soil before watering to make sure it is dry to the touch.
3. What kind of soil should I use for my house plants?
House plants do best in a well-draining soil mix that is rich in nutrients. Look for a potting mix that contains peat moss, vermiculite, and perlite. You can also add some compost or fertilizer to the soil mix to give your plants an extra boost.
4. Can I keep my house plants outside?
While some house plants can thrive outdoors, most are not suited for outdoor conditions. In general, it is best to keep your house plants indoors where they can be protected from extreme temperatures, wind, and pests.
5. How can I prevent my house plants from getting pests?
The best way to prevent pests on your house plants is to keep them clean and healthy. Regularly dust the leaves and inspect the plants for any signs of pests or diseases. If you do notice pests, isolate the affected plant and treat it with an appropriate pesticide or natural remedy.
6. What should I do if my house plants start to droop or wilt?
If your house plants start to droop or wilt, it may be a sign that they are not getting enough water or nutrients. Check the soil and make sure it is not too dry or too wet. You may also need to fertilize the plant or repot it in fresh soil. If the problem persists, it may be a sign of a more serious issue, such as a pest infestation or disease.
7. Can I propagate my house plants?
Yes, many house plants can be propagated through cuttings or division. To propagate a plant, take a cutting from a healthy stem and place it in water or soil. Keep the cutting moist and in a warm, bright location until it has developed roots. You can also divide some plants by carefully separating the roots and replanting them in a new pot.

Brody is a skilled craftsman and gardening expert. From renovating living spaces to cultivating lush gardens, Brody’s knowledge and passion shine through, inspiring readers to embark on their own home improvement and gardening journeys with confidence.


Leave a Reply