
Home improvement is always a work in progress, and the toilet is one of the most important fixtures you should focus on. While toilets are generally sturdy and reliable, there are issues that every homeowner or apartment dweller must face at some point. Clogging is a common problem, but there are other issues like strange tank noises and continuous water running that can be fixed by a do-it-yourself plumber.
If you’re a DIY person, fixing your toilet yourself can save you money and hassle. In this article, we’ll discuss some common toilet issues and how you can fix them.
Replacing a Toilet Seat
The easiest toilet repair task is replacing the lid and seat. You can choose from a variety of styles and colors to match your bathroom’s motif. Replacement seats come in two standard sizes that fit most modern toilets.
To replace the seat, remove the old one by unscrewing the two nuts on the hinge. Lift the old seat up and out. If the nuts are rusted or corroded, you can apply some penetrating oil to help loosen them. Give the oil time to soak in before using a wrench or deep socket wrench to remove the nuts. Be careful not to use too much force as it can damage the tank or bowl. Once you remove the old seat, you can install the new one by inserting the bolts, slipping on the washers, and tightening the nuts. Be careful not to overtighten the nuts, or you might have trouble removing the seat later.
Toilet Articles
|
Sink, Tub and Drain Troubleshooting Guide
Problem |
Possible Cause |
Solution |
| Water in tank runs constantly | Float ball or rod is misaligned. | Bend float rod carefully to move ball so it will not rub against side of tank. |
| Float ball contains water. | Empty or replace float ball. | |
| Float ball not rising high enough. | Carefully bend float rod down, but only slightly. | |
| Tank ball not sealing properly at bottom of tank. | Remove any corrosion from lip of valve seat. Replace tank ball if worn. Adjust lift wire and guide. | |
| Ballcock valve does not shut off water. | Replace washers in ballcock assembly or, if necessary, replace entire assembly. | |
| Toilet does not flush or flushes inadequately | Drain is clogged. | Remove blockage in drain. |
| Not enough water in tank. | Raise water in tank by bending float rod up slightly. | |
| Tank ball falls back before enough water leaves tank. | Move guide up so tank ball can rise higher. | |
| Leak where tank joins toilet bowl. | Tighten nuts on spud pipe; replace spud washers, if necessary. | |
| Ports around bowl rim clogged. | Ream out residue from ports. | |
| Tank whines while filling | Ballcock valve not operating properly. | Replace washers or install new ballcock assembly. |
| Water supply is restricted. | Check shutoff to make sure it’s completely open. Check for scale or corrosion at entry into tank on valve. | |
| Moisture around fixture | Condensation. | Install foam liner, tank cover, drip catcher or temperature valve. |
| Leak at flange wax seal. | Remove toilet and install new wax ring seal. | |
| Leak at bowl-tank connection. | Tighten spud pipe nuts; replace worn spud washers, if necessary. | |
| Leak at water inlet connection. | Tighten locknut and coupling nut; replace washers and gasket, if necessary. | |
| Crack in bowl or tank. | Replace bowl, tank, or entire fixture. |
If none of the above solutions work, you may have to use a hacksaw to cut off the bolts. To avoid damaging the bowl’s finish, apply tape to the spots where the hacksaw blade is likely to rub against. Then, carefully saw through the bolts, being cautious not to slip and crack the fixture. Once the bolts are removed, you can easily take off the old seat and clean the area before installing the new one. Insert the bolts and tighten the nuts, but be careful not to over-tighten them as you may need to replace the seat again in the future. If you live in a rented apartment and install a new seat, keep the old one so you can replace the new one with the original before you leave.
If the rubber bumpers on the toilet seat are worn out, replacements can be purchased at a hardware store. Some bumpers require screws, while others need to be nailed or glued in place. When installing new bumpers, try to conceal the original holes.
To clear a clogged toilet, use a plunger to dislodge the blockage. Make sure there is enough water in the bowl to cover the suction cup of the plunger. If there isn’t enough water, add more from another source. If the plunger doesn’t work, try using a wire coat hanger or a closet or toilet auger to hook and remove the blockage. In extreme cases, the toilet may need to be removed from the floor to access the blockage.
Tank troubles, such as strange noises or continuous water running, can be annoying and costly. Most issues can be easily fixed.
Toilet tank issues are a common and frustrating problem, and they might lead to unnecessary water wastage and costs. Nonetheless, most of these problems can be resolved quickly and easily. The diagram below represents a typical toilet tank and its components. Once you understand how a toilet functions, you can begin to identify the source of the problems. Lift the lid off the toilet tank, and you’ll be able to follow the steps below easily.
When you pull the handle to flush the toilet, a trip lever inside the tank is raised. This lever lifts wires, which in turn lift the tank ball or rubber flap at the bottom of the tank. Once the flush valve opening is clear, the water in the tank rushes out, passing the raised tank ball and entering the toilet bowl beneath. This raises the water level in the bowl above the level of water in the toilet trap.
As the water flows out of the tank, the float ball, which floats on top of the water in the tank, falls. This pulls down on the float arm, raising the valve plunger in the ballcock assembly and allowing fresh water to flow into the tank. Since water always seeks its own level, the water from the tank pushes the bowl water out into the drain, creating a siphoning action that cleans everything out of the bowl. When the water is drained from the toilet bowl and air is drawn into the trap, the siphoning stops. The tank ball then falls back into place, closing the flush valve opening.
As the water level in the tank rises, the float ball rises as well until the float arm is high enough to lower the valve plunger in the ballcock assembly and shut off the incoming water. If the water continues to flow, there is an overflow tube that carries the excess water down into the bowl to prevent the tank from overflowing. If water continuously flows out of the tank and into the bowl, follow the steps below:
Step 1: Lift the float arm. If the water stops, the issue is that the float ball doesn’t rise high enough to lower the valve plunger in the ballcock assembly. The float ball might be rubbing against the side of the tank. If that’s the case, bend the float arm slightly to move the ball away from the tank’s side.
Step 2: If the ball doesn’t touch the tank, keep holding the float arm and remove the ball from the arm’s end by turning it counterclockwise. Then shake the ball to see if there’s water inside it. The water’s weight inside could be preventing the ball from rising normally. If there is water in the ball, shake it out and put the ball back on the float arm. If the ball is damaged or corroded, replace it with a new one. If there is no water in the ball, put the ball back on and gently bend the float rod down to lower the level the float ball must reach to shut off the flow of fresh water into the tank.
Step 3: If the previous steps do not resolve the issue, inspect the tank ball located at the flush valve seat. The accumulation of chemical residue from the water can prevent the ball from seating correctly, or the ball itself may have deteriorated. Water will leak through the flush valve opening into the toilet bowl below. Turn off the water at the toilet shutoff valve and flush the toilet to empty the tank. You can examine the tank ball for signs of wear and install a new ball if necessary. If the issue is chemical residue on the lip of the flush valve opening, use wet-dry emery cloth, steel wool, or a knife to clean away the debris.
Step 4: If water still flows excessively through the toilet, the guide or lift wire that raises and lowers the tank ball may be out of line or bent. Ensure the guide is in place so that the wire is directly above the flush valve opening. Rotate the guide until the tank ball falls straight down into the opening. If the lift wire is bent, try bending it back to the correct position, or install a new one. Make sure the trip lever rod is not rubbing against anything, and the lift wire is not installed in the wrong hole of the rod as either situation could cause the tank ball to fall at an angle and not block the opening as it should.
If neither the float ball nor the tank ball is the issue, then the problem must be in the ballcock assembly.
Fixing a Toilet Ballcock Assembly
The ballcock assembly appears more complex than it is. When purchasing a new ballcock assembly, you will find plastic and metal units available at a hardware or plumbing-supply store. Plastic is less expensive and will not corrode, but it is less sturdy than metal. Furthermore, plastic units are often sealed and cannot be repaired. Nevertheless, you can purchase a different type of unit from the one being replaced as long as the new assembly has a threaded shank the same size as the old one. If possible, bring the old assembly with you when buying the replacement. Here’s how to repair an older-style ballcock assembly:
Step 1: Ensure the water shutoff valve for the toilet is in the OFF position.

On many older ballcock assemblies, a pair of thumbscrews holds the valve plunger. You will have to unscrew them to remove the valve.
Step 2: Remove the valve plunger, and you’ll see one or two washers or O-rings. If any of these parts are defective, water will continuously flow out past the plunger, and the toilet will run constantly. Inspect all the washers and replace any faulty ones.
Step 3: If the ballcock assembly is sealed, replace it as a unit. Turn off the toilet water supply at the shutoff valve and flush the tank. Remove the float arm from the old ballcock unit and take out the refill tube from the overflow tube.
Step 4: Check under the tank for a coupling or slip nut where the water inlet
pipe enters the base of the tank. Loosen the coupling nut to release the water
inlet pipe. Then use an adjustable wrench to hold the retaining nut or locknut
immediately above the slip nut under the tank. Use another wrench to grip the
base of the ballcock assembly shaft inside the tank.
Step 5: Loosen the locknut under the tank to remove the ballcock assembly.
If the nut is difficult to remove, apply penetrating oil to loosen it.
Step 6: Remove the old assembly from the tank and keep the washers from all
connections, both inside and outside the tank. New washers will likely be provided
with the replacement unit, but keep the old parts until the new ballcock assembly
is installed in case new parts are damaged during installation.
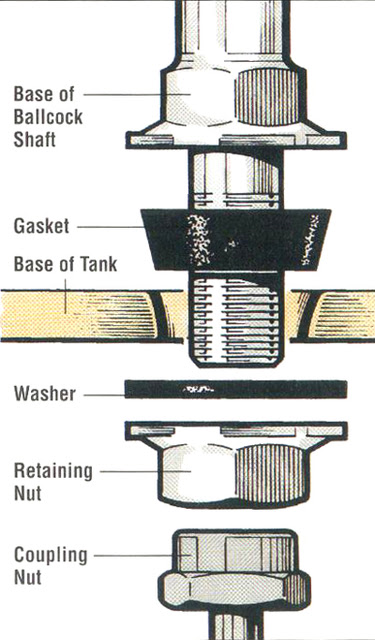
When installing a new ballcock assembly, ensure that the gasket and the
washer are correctly positioned and firmly secured by the retaining unit.
Step 7: Insert the new ballcock assembly into the hole in the tank. With the
inside washer in place, tighten the locknut on the outside to make
the inside washer fit watertight against the hole, but avoid over-tightening
it.
Step 8: Reattach the coupling nut and water inlet pipe, reinstall the float
arm, and set the refill tube into the overflow tube.
Step 9: Turn on the water supply at the toilet shutoff valve and check for leaks
at all points. Additionally, make sure that the float ball does not
rub against the back of the tank.
Newer types of ballcock assemblies eliminate the float arm and float ball.
One type features a plastic cup that floats up to cut off the water as the tank
fills. You can adjust the water level in the tank by moving the plastic cup on a pull rod. One advantage of this type of ballcock assembly
is that it allows the water to run at full force until the tank is filled. It then shuts
off the water immediately, eliminating the groaning sounds that some toilets make
when a float arm gradually closes the valve.
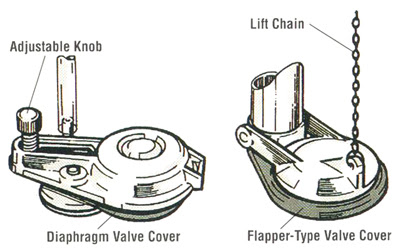
One type of diaphragm-powered valve sits close to the bottom of the
tank (left); it eliminates the float ball and float arm. Another type (right)
uses a flapper cover lifted by a chain.
Another type of ballcock assembly also eliminates the float ball and float arm. This
is a small unit that sits almost on the bottom of the tank; its diaphragm-powered
valve detects the water level from down there. Furthermore, since no tools are required, this assembly is an easy unit to install. To install these newer ballcock
assemblies:
Step 1: Turn off the tank’s water supply shutoff valve. Then flush the
toilet to empty the tank. Soak up any remaining water in the tank before proceeding.
Step 2: Remove the old ballcock assembly, following the procedure outlined
above. Slip the parts over the water inlet pipe under the tank in this order:
coupling nut, friction washer, cone washer, and retaining or mounting nut.
Fixing Toilet Issues
To install a new unit inside the tank, follow these steps:
Step 1: Turn off the water supply valve and flush the toilet to empty the tank.
Step 2: Remove the old unit by unscrewing the retaining or mounting nut and pulling it out.
Step 3: Install the new unit by fitting the threaded shank down the hole over the water supply pipe and tightening the retaining or the mounting nut under the tank onto the threaded shank. Push the washers into place and hand-tighten the coupling nut under the tank.
Step 4: Attach one end of the refill tube to the tank’s overflow pipe and place the other end on the stem of the replacement unit.
Step 5: Open the water supply valve to fill the tank. Adjust the water level in the tank by using the knob on the new valve unit.
What can you do if the toilet bowl isn’t getting enough water to flush properly? Follow these steps:
Step 1: Check the water level in the tank and adjust the float arm if necessary.
Step 2: If the water level is fine but there’s still not enough water coming from the tank, check if the tank ball on the flush valve seat is dropping too soon. Raise the guide to fix the issue.
Step 3: If the problem persists, check if the small ports around the underside of the toilet bowl’s rim are clogged with residue. Use a small mirror and a wire coat hanger or an offset Phillips screwdriver to clean the holes.
Another common issue is toilet tank sweating and dripping onto the floor. To fix this, consider using jackets designed for the tank or drip pans to catch dripping condensation. A temperator valve can also be installed to regulate the temperature inside the tank and prevent sweating.
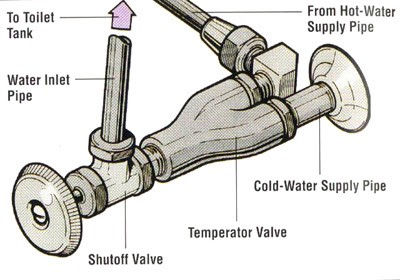
To prevent toilet tank sweating, a temperator valve is required that needs both hot-water and cold-water supply connections.
However, connecting a hot-water line to the valve can be inconvenient if there is no such line close to the toilet. Additionally, even with a temperator-equipped toilet, water inside the tank can still cool between flushings, and condensation can occur. Loose connections or defective washers on the spud pipe or where the water inlet pipe and ballcock assembly attach to the tank may cause leaks. Replace any worn gaskets or washers, and tighten all the nuts. Then, test with bluing in the water.
If water is seeping out from under the toilet bowl, the wax ring seal that joins the bowl to the drain outlet may be defective. In this case, the bowl must be removed, and a new gasket installed. If the leak is due to a crack in the tank or bowl, the whole toilet must be replaced.
Replacing a Toilet
Removing and replacing a toilet is not a simple task, but it is doable if you have a good reason. When you can’t unblock the toilet by less drastic means, removing it is the solution. Maybe you want a more modern toilet, or maybe the bowl or the tank is cracked, or perhaps the fixture leaks around its base. All of these scenarios call for removing and reinstalling the old toilet or installing a new fixture.
However, local plumbing code may restrict anyone other than a licensed plumber from doing the job. Check your community’s code to ensure that it is acceptable for you to do the work. To replace a toilet:
Step 1: Measure the rough-in distance, which is the distance from the wall behind the bowl to the center of the toilet floor drain. Measure from the wall to the center of either of the two hold-down bolts, one on each side of the toilet, that hold the fixture to the floor. If there are two bolts on each side, measure to the center of the rear bolt.
Step 2: Choose the replacement toilet unit that fits properly in your bathroom, using the rough-in distance. You can replace your old toilet with a more modern fixture, but ensure that the new unit will fit into the space between the drainpipe and the wall. You can install a smaller unit, but you cannot put a larger toilet into a space that was occupied by a smaller fixture.
Step 3: Turn off the water supply to the toilet tank, then remove all the water from both the tank and the bowl. Eliminate most of the water from the tank by tripping the flush handle. Then, use a sponge to soak up any remaining water. Use a small container to bail out the water in the bowl, and then use a sponge to dry out the bowl completely.
Step 4: If the tank is attached to the wall, remove the hanger bolts inside the tank that secure the tank to the wall. Then, remove the pair of bolts at the bottom of the tank that connect the tank to the bowl. Remove the tank and set it out of the way.
Step 5: If there are any, remove the caps covering the hold-down bolts at the base of the bowl. These caps are usually made of ceramic to match the bowl and can be removed by prying them off with a putty knife or unscrewing them. After removing the caps, clear away any dried compound before proceeding.
Step 6: Remove the hold-down nuts or bolts. These can be difficult to remove, but using some penetrating oil can make the job easier. Remember to save the washers and bolts if you plan on reinstalling the bowl. Once the hold-down nuts or bolts are removed, there will be nothing else holding the bowl to the floor. Note: To prevent sewer gas from backing up the drain, be sure to plug the opening while you work. Tie an old towel around a cord and use it as a plug for the drain.
Step 7: Carefully remove the bowl by rocking it gently back and forth to loosen it, and then lift it straight up. It is important to spread out an old piece of carpeting to prevent the bowl and the tank from cracking due to any sharp blows. Have a bucket and sponge ready to soak up any remaining water. The bowl weighs approximately 60 to 70 pounds, so be careful when lifting it. Place the bowl on the piece of carpeting.
Step 8: Inspect the uncovered drain and clear it if necessary. Once the pipe is clear, you can proceed with installing the new toilet.
Step 9: Installing a new toilet and reinstalling the old one require the same steps. Use a putty knife to remove any old putty or sealing material from the bottom of the bowl and the floor flange.
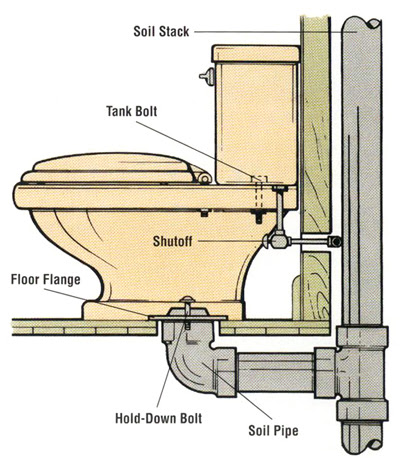
A typical installation of a two-piece floor-mounted toilet.
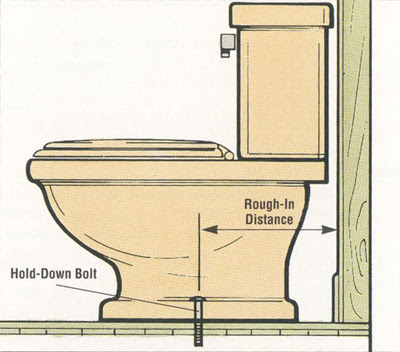
The rough-in distance can be measured with the toilet in place by measuring from the wall to the center of the hold-down bolt, or to the center of the rear bolt if the fixture is held by two pairs of bolts.
Check the floor where the toilet was. If the floor is rotted, it must be rebuilt before installing the toilet. Depending on the severity of the damage, rebuilding may include the floor, subfloor, and even the joists. In this case, have a carpenter rebuild the damaged area before installing the toilet. Also, inspect the flange and bolts that come up from the flange. If the flange is damaged or the bolts are stripped, replace the faulty part or parts before proceeding.
Step 10: Install a new sealer ring on the water outlet opening on the bottom of the new bowl. With the fixture upside down, place the sealer ring on the bottom of the bowl. If the floor flange is recessed, use a gasket with a plastic sleeve in the ring. The sleeve should face toward you as you position it since it will go into the soil pipe.
Step 11: Apply a uniform layer of toilet-bowl setting compound, approximately 2 1/8 inches thick, around the edge of the bowl at the base. This compound can be found at hardware stores and plumbing-supply stores.
Step 12: Take out the plug from the soil pipe or drain. Flip the bowl back to its
original position and place it on the flange while directing the bolts into place.
Push down firmly and slightly twist the bowl to ensure that the wax ring fits
properly against the flange. Use a level to check if the bowl is even. Adjust the
bowl as necessary to level it out, but be careful not to disrupt or damage the seal
of the wax ring or the toilet will leak.
Step 13: Hand tighten the nuts to secure the bowl to the floor. Do not overtighten
the nuts or you may crack the fixture. Apply toilet bowl setting compound to the
hold-down nuts and bolts and then replace the caps.
Step 14: If the tank and bowl are separate fixtures, attach the tank now. Re-bolt
a wall-mounted tank or re-install the bolts and washers that connect a bowl-supported
tank. Replace any broken parts. If the tank and bowl are connected with a spud pipe,
apply pipe joint compound to the threads of the spud slip nuts and tighten them.
Step 15: Reconnect the water supply inlet pipe to the tank, ensure that the ballcock
assembly is correctly attached, and turn the water back on.
More Information
Related HowStuffWorks Articles
- How Toilets Work
- How Tankless Toilets Work
- How Low-flow Toilets Work
- How Dual Flush Toilets Work
- How to Repair a Dishwasher
- How to Repair a Dryer
- How to Repair Major Appliances
- Top 10 Appliances We Can’t Live Without
FAQ
1. What are some common toilet problems?
Some common toilet problems include a clogged toilet, a running toilet, a leaking toilet, a weak flush, and a loose handle.
2. How can I unclog my toilet?
You can unclog your toilet using a plunger or a toilet auger. First, try using the plunger by creating a seal around the drain and pushing and pulling the plunger up and down. If that doesn’t work, try using a toilet auger by inserting it into the drain and twisting it until you feel resistance. Then, pull the auger out and dispose of any debris.
3. How can I fix a running toilet?
To fix a running toilet, start by checking the flapper valve, which is located in the tank and controls the water flow. If the flapper is worn or damaged, replace it. If that doesn’t work, check the fill valve, which is also located in the tank and controls the water level. Adjust the fill valve or replace it if necessary.
4. How can I repair a leaking toilet?
To repair a leaking toilet, first inspect the tank and bowl for cracks or damage. If you find any, replace the affected part. If the toilet is still leaking, check the wax ring seal between the toilet and the floor. If it’s damaged, replace it.
5. How can I fix a weak flush?
To fix a weak flush, start by checking the water level in the tank. If it’s too low, adjust the fill valve. If that doesn’t work, check the rim holes under the toilet bowl’s rim. Clean them with a wire hanger or a small brush to remove any mineral buildup that may be blocking the water flow.
6. How can I tighten a loose toilet handle?
To tighten a loose toilet handle, first remove the lid from the tank. Then, tighten the mounting nut located on the inside of the tank that secures the handle to the flush lever. If that doesn’t work, replace the handle and flush lever assembly.
7. Can I repair a cracked toilet bowl?
No, you cannot repair a cracked toilet bowl. You will need to replace the entire toilet.
8. How often should I replace the toilet’s internal parts?
You should replace the toilet’s internal parts, such as the flapper valve and fill valve, every 5-7 years to prevent problems and ensure proper functioning.
9. How can I prevent my toilet from clogging?
To prevent your toilet from clogging, avoid flushing anything other than toilet paper and human waste. Also, consider using a low-flow toilet or installing a toilet with a larger drain to prevent future clogs.
10. How can I clean my toilet?
To clean your toilet, start by pouring a bowl cleaner or vinegar into the bowl and letting it sit for 10-15 minutes. Then, scrub the bowl with a toilet brush and flush. For the outside of the toilet, use a disinfectant cleaner and a cloth or sponge to wipe down the tank and bowl.
11. Can I repair a toilet by myself or should I hire a professional?
It depends on the severity of the problem and your level of experience. Simple problems like unclogging a toilet or replacing a flapper valve can be done by yourself. However, more complex issues like repairing a leaking toilet or replacing the entire toilet may require the help of a professional plumber.

Brody is a skilled craftsman and gardening expert. From renovating living spaces to cultivating lush gardens, Brody’s knowledge and passion shine through, inspiring readers to embark on their own home improvement and gardening journeys with confidence.


Leave a Reply