
Home renovation projects can be a daunting task, especially when it comes to installing wall-to-wall carpeting. However, with proper preparation and attention to detail, the process can be accomplished with ease. This article will provide you with the essentials you need to know to install carpet in any room of your house, from selecting materials, to measuring and preparing, to placing the padding and carpet in position. Large rooms may require professional assistance, but for the most part, the task can be completed by any homeowner.
Tools Needed:
- Measuring tape
- Hammer
- Nail set
- Screwdriver
- Putty knife
- Vacuum cleaner
- Work gloves
- Tack hammer
- 1/4-inch-thick piece of scrap wood
- Small handsaw
- Heavy scissors
- Staple gun
- Paintbrush or fine-toothed notched trowel
- Utility knife with sharp heavy-duty blades
- Knee kicker (available for rent from most carpet dealers)
- Block of scrap wood
- Plane
Materials Needed:
- Graph paper
- Flooring nails
- Wood putty
- Tackless carpet fastening strips
- Metal door edging strip for each doorway in room
- Latex or vinyl foam carpet padding
- Foam padding adhesive
- Heavy-duty staples
- Precut and preseamed carpeting
Additional Information:
- How to Carpet a Stairway: After you’ve carpeted a room, learn how to apply your skills to a set of stairs.
- Carpet-Cleaning Tips: Once your new carpet is in place, use these tips to keep it free of stains and looking new.
- How to Repair Floors: Need to fix a floor? Use these instructions to get the job done.
Preparing for Carpet Installation
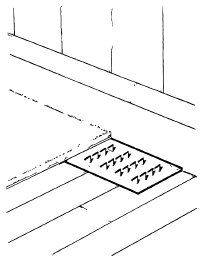
Nail fastening strips along the edge of the floor.
One of the most challenging aspects of installing carpeting is determining how much to buy and how to properly configure it. Carpets are sold in 9-foot, 12-foot, and 15-foot widths, while padding is sold in standard 4 1/2-foot rolls. Before purchasing, measure the room to be carpeted and create a floor plan on graph paper to ensure accuracy. Be sure to mark the exact position and width of all doors, windows, fireplaces, radiators, and other wall interruptions, as well as the full depth of door frames. Bring this floor plan with you when visiting the carpet dealer.
Consult with the dealer to carefully plan the carpeting and padding layout, maximizing the full width of the carpeting and minimizing seams in high-traffic areas. Calculate the square yardage to be carpeted by multiplying the length and width and dividing by 9, then take the dealer’s advice on the necessary lengths of carpeting and padding.
Although it is possible to cut and seam the carpeting yourself, it can be a challenging task. In a small room that is no wider than the carpet roll, you may not need to make seams. Otherwise, have the carpet dealer cut and seam the carpeting to fit the room.
When installing carpet, the dealer should determine the type and amount of tackless strip fastener needed. These fasteners come in 4-foot strips and the type required depends on the thickness of the carpet and the floor being covered. The strips have preset edge tacks and nails for installation over wood or concrete. It is crucial to purchase the correct kind and buy extra strips to account for any mistakes. Additionally, metal door edging strips should be cut to fit the exact measurements of the doors.
A knee kicker should be rented from the carpet dealer to stretch the carpet edges onto the fastening strips. Before installing the carpet, the floor must be prepared. All furniture should be removed from the room, and doors that open into the room should be taken off. Loose nails should be pounded in, and squeaky floorboards should be reset with flooring nails. If the floor is covered with resilient tile or sheet flooring, it must be removed, and the subfloor should be prepared to avoid condensation.
To complete preparations, floor register covers and quarter-round baseboard molding should be removed if the latter is not intended to cover the carpeting. Any wide cracks in the floor should be filled with wood putty and let to dry completely. Vacuuming the room thoroughly before starting is essential.
The first step is to nail down the fastening strips. Starting at a corner, the strips should be nailed along the edge of the floor, 1/4 inch from the wall, with their teeth facing the wall. A 1/4-inch-thick piece of scrap wood should be used to maintain the 1/4-inch gap between the strip and the wall as the fastener is nailed into place. A guide board should be slid along the wall as the fastener strips are nailed into place to ensure they are nailed evenly.
When working around corners, fastener strips should be cut to fit with a small handsaw. Strips should be nailed in front of radiators, and metal door edging strips should be nailed across the floor in each doorway. The open rim of the metal door edging strip should point into the room, and the teeth should face out. The rim should align perfectly with the edge of the door when both the carpet and door are in place.
After preparing the floor, the next step is to put the padding and carpet in place, which will be discussed on the following page.
Discover more about carpet installation by checking out these links:
- How to Carpet a Stairway: Learn how to carpet a staircase after successfully installing carpet in a room.
- Carpet-Cleaning Tips: Keep your carpet looking new and free of stains with these helpful tips.
- How to Repair Floors: Follow these instructions to repair a damaged floor.
Installation Process
To install the carpet, begin by nailing the fastener strips into place. Once all strips are secure, take the rolled-up carpeting and position it in the room. Unroll it onto the bare floor to avoid moving the padding out of place later. Roll the carpeting back from one side to the center of the room to expose the floor again.
Next, unroll a strip of foam padding along the edge of the floor across the bare side of the room from wall to wall. Cut the strip, leaving about 2 inches overlapping the fastening strips at each end. Position the strip over the bare end of the floor so that it overlaps the fastening strips on both ends and along the wall. Staple it into place diagonally every 6 inches or so along all four edges of the padding.
Repeat the same process for the rest of the room, rolling the carpeting back so the padding can be rolled into place. Butt the edges of the padding strips and staple every 6 inches along every edge. Trim the padding to fit around obstacles as closely as possible.
For concrete floors, use carpet padding adhesive to anchor the foam padding. Spread adhesive on the exposed floor with a paintbrush or a fine-toothed notched trowel. Roll the padding out onto the adhesive, pressing and smoothing it into place. Repeat until the entire floor is padded. Fill in under radiators with small pieces of padding.
Trim off the edges overlapping the fastening strips using a utility knife with a sharp heavy-duty blade. The surface of the padding should be even with the surface of the fastening strips.
Finally, unroll the carpeting over the padding and pull it into position, overlapping the fastening strips around the room. Make straight cuts and crosscuts to fit the carpeting around radiators and other obstructions. Do not cut holes in the carpet to accommodate them. Trim carefully around open floor registers, leaving a slight overlap.
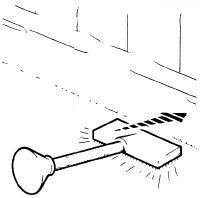
To attach the carpet to the fastening strips, use a knee kicker. Begin in a corner and place the head of the kicker flat on the carpet about an inch from the wall. Lean on the floor with one hand and hold the kicker’s handle with the other. Apply pressure on the knee opposite the arm holding the kicker and move the other knee forward suddenly to hit the cushioned end of the kicker. The head of the kicker will stretch the carpet and hook it onto the teeth of the fastening strip at the edge of the floor. Repeat the process on the opposite wall of the corner. Fasten two adjacent corners in the same way, leaving the diagonally opposite corner loose. Work from the starting corner out along the two walls, holding the carpet in place with one hand and using the other to kick the next few inches of carpet. Trim the carpet edges using a utility knife with a sharp heavy-duty blade. To complete the installation, wedge the trimmed edge of the carpet into the gap between the walls and the fastening strips using a stiff putty knife. Push the raw carpet edge under the rim, trim it carefully to fit under the curved rim of the door finishing strip, and use a hammer and a wood block to pound the rim firmly down over the carpet edge. Finally, replace the floor registers, quarter-round baseboard molding, and rehang the doors. If the new carpeting is much thicker than the old floor covering, plane the bottom edge of each door to open and close easily.
FAQ
1. What tools do I need to install carpeting?
To install carpeting, you will need a power stretcher, knee kicker, carpet knife, measuring tape, chalk line, seam iron, seam tape, and a staple gun. You may also need a carpet cutter and a carpet tucker.
2. How do I prepare the subfloor for carpeting?
The subfloor needs to be clean, dry, and level before installing carpeting. Remove any debris and adhesive residue, fill in any holes or gaps, and sand down any high spots. It is also recommended to install a carpet pad for added cushioning and insulation.
3. How do I measure the room for carpeting?
To measure the room for carpeting, measure the length and width of the room at its longest and widest points. Add an additional 4-6 inches to each measurement for trimming and fitting. Multiply the length and width measurements to get the square footage of the room.
4. How do I cut and seam the carpeting?
Cut the carpeting to fit the room, leaving extra material for trimming and fitting. Use a seam iron and seam tape to join the pieces of carpeting together, being careful to match the pattern and direction of the carpet fibers.
5. How do I stretch and secure the carpeting?
Use a power stretcher and knee kicker to stretch the carpeting taut across the room. Trim any excess material and staple the carpeting to the subfloor along the edges and seams. Use a carpet tucker to hide the staples and create a clean finish.
6. How long does it take to install carpeting?
The time it takes to install carpeting depends on the size and complexity of the room. A small, simple room may take a few hours, while a large, intricate room may take a full day or more.
7. Can I install carpeting myself or should I hire a professional?
While it is possible to install carpeting yourself, it is recommended to hire a professional for best results. Professional installers have the experience and tools necessary to ensure a flawless installation.
8. How do I maintain and clean my carpeting?
To maintain and clean your carpeting, vacuum regularly to remove dirt and debris. Avoid using harsh chemicals or abrasive cleaning tools that can damage the carpet fibers. Consider hiring a professional carpet cleaner for deep cleaning and stain removal.
9. How long does carpeting last?
The lifespan of carpeting depends on the quality of the carpet and the amount of foot traffic it receives. On average, carpeting lasts 5-15 years with proper care and maintenance.
10. What are some eco-friendly options for carpeting?
There are several eco-friendly options for carpeting, including recycled carpet fibers, natural materials such as wool or sisal, and low-VOC carpeting that emits fewer harmful chemicals. Look for certifications such as Green Label Plus or Cradle to Cradle to ensure environmentally-friendly carpeting.

Brody is a skilled craftsman and gardening expert. From renovating living spaces to cultivating lush gardens, Brody’s knowledge and passion shine through, inspiring readers to embark on their own home improvement and gardening journeys with confidence.


Leave a Reply