
Home improvement can be made easy by painting the interiors of your house with the help of a professional painter. Decorating interiors with paint can change the entire look and feel of the rooms. It is a quick and affordable option for home improvement. The articles linked below provide detailed instructions on painting interiors and are perfect for anyone who is looking for a DIY project.
Painting walls is a big job. You need to know how to paint them thoroughly and neatly. The biggest surfaces in your home are the walls, so it is important to know how to paint them well.
Painting ceilings and tight spots can be a bit difficult. However, with the right tools and techniques, it can be done smoothly and without any hassle.
Painting trim, baseboards, and wainscoting is another important task. The edges of a room are like the frame of a picture, and it is important to apply just the right touch to this painting job.
Painting windows requires extra care. It is important to get it right, so be sure to read the article to learn how to do it properly.
A door is the first thing people see when they enter a room. Therefore, it is important to enhance this household feature with a coat of paint. The same goes for shutters. Painting shutters can be extremely difficult, but it can be done with the right tools and techniques.
Kitchen cabinets are an essential part of any kitchen. Painting them can make a big difference in the look and feel of your kitchen.
Painting floors is another option for home improvement. A coat of paint can make a dramatic statement in any room.
Textures can be added to your walls and surfaces to give them a new layer of character. Applying textures can bring a weathered or stucco look indoors.
Stripes and stencils are easy ways to add visual flair to any interior surface. Painting stripes can be done on any wall or surface, and stencils are easy to design and paint.
After all the painting is done, it is important to properly clean up the equipment. Proper cleanup will keep your home looking spotless and prevent accidents that might undercut all your hard work.
If you want to learn more about painting and home improvement, check out:
- Interior Paints: Select the ideal paint type from this list to ensure your newly-painted interiors can withstand daily wear and tear.
- Interior Painting Preparation: To perform a successful painting job, preparation is key. These tips will help you get started.
- House Painting: For all things related to improving your home with paint, visit this page.
- Home Improvement: After you’ve finished painting, discover ways to make other improvements in every area of your home.
Painting Walls
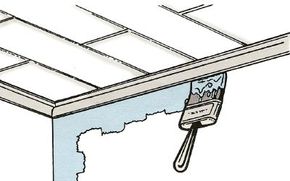
© 2007 Publications International, Ltd. Use a brush to paint along the edge of the ceiling next to moldings and to paint next to corners. This technique is called “cutting in.”
Your home’s interior is much more than just four walls. However, walls are likely the largest and most frequently encountered surfaces when making quick fixes to your home. By painting one or all of the walls in a room, you can make a significant change in the room’s appearance.
Paint an entire wall before taking a break so the painted portions won’t lose their wet edges. Then step back, examine the wall, and cover any missed spots or smears. Whether you paint in sections from top to bottom or from side to side across the room is up to you. However, if you’re using an extension handle on your roller, you may find it more convenient to start at one high corner and go all the way across the room with a series of completed zigzag patterns. This way, you won’t have to constantly change the handle on your roller as you would if you painted in sections from the ceiling down to the floor. If you’re right-handed, start in the room’s left-hand corner. If you’re left-handed, start in the room’s right-hand corner.
Not what you’re looking for? Try these helpful articles:
- House Painting: Ready to tackle a house painting project? Gather helpful tips on both interior and exterior painting in this home improvement article.
- House Painting Tools: Before taking on any painting project, make sure you have the tools you’ll need to do the job well. This article will help.
- Room Painting Techniques: To learn about how to use these tools properly and effectively, brush up on these methods.
- Paint Rollers: Find out when a paint roller is the best tool for the job on this page.
Painting Ceilings and Tight Spots
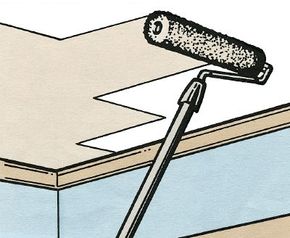
© 2007 Publications International, Ltd. When using a roller, work in strips across, always working over the wet edge of previously painted strips.
You may believe that painting the walls in a room is the most impactful aspect, but it’s also crucial to pay attention to other areas, such as ceilings, when painting a room. The following tips will cover painting ceilings, as well as tight spots in a room.
Ceiling Painting Tips
For a smooth finish when painting a ceiling, it’s important to maintain a wet edge and avoid creating lines or ridges. If you’re using fast-drying paint, work quickly and consider using an extension handle to paint from the floor instead of a stepladder. Many roller handles can accept an extension that can be purchased at a paint store or try using a broom or mop handle.
Painting Tight Spaces
When painting areas above doors, doorways, and windows, use a horizontal rolling technique instead of the zigzag method used for walls. For narrow areas, use a 4-inch roller or paintbrush, with the roller recommended for a consistent surface finish. Brushes can leave uneven coverage and create trails.
Need More Help?
- House Painting: Get tips for interior and exterior painting projects with this helpful home improvement article.
- House Painting Tools: Make sure you have the right tools for your painting project by reading this article.
- Painting Trim, Baseboards, and Wainscoting: Find out how to paint the edges of a room with this guide.
- Paint Rollers: Learn when to use a paint roller with this helpful page.
Painting Woodwork
There are differing opinions on whether to paint woodwork before or after painting walls. Some prefer to paint the woodwork first, as any drips or spatters can be feathered out instead of removed. However, rollers can create a fine spray of paint that can end up on the woodwork. Regardless of the order, inspect the woodwork for defects and make repairs before painting. If painting over glossy woodwork, lightly sand or use a coat of deglosser for better adhesion.
Painting Trim
If you plan to use the same color and finish on all surfaces, it may be easier to paint the trim as you come to it while painting the walls. This technique will require switching between a brush and roller, but it’s not too difficult in rooms with only a few windows and one door. Alternatively, if you choose to paint the trim first, use masking tape or painter’s tape to protect it while painting the ceiling and walls.
Painting Baseboards
To paint the top of a baseboard, start by painting down from the top with five or six short strokes, then smooth it out with one long stroke. Using a painting shield or thin cardboard as a movable masker, paint along the floor. Next, fill in the unpainted space between with long brush strokes, painting only two or three feet of baseboard at a time. Check for drips, spatters, and overlapped edges, and clean them immediately. Don’t wait until the entire baseboard is painted or the paint flaws will have already set.
Painting Wainscoting
Painting wainscoting or paneling requires a similar approach to baseboards. Cut in along the top and bottom edges where the wainscoting meets the wall and floor, then paint the indented panels and molding around them. When painting the raised surfaces around and between panels, work from top to bottom and use up-and-down strokes on the verticals and back-and-forth strokes on the horizontals. Brush strokes should be toward the center of the panel to avoid paint pooling in the corners.
Not what you’re looking for? Try these helpful articles:
- House Painting: If you’re ready to tackle a house painting project, this home improvement article offers helpful tips for both interior and exterior painting.
- House Painting Tools: Be sure you have the right tools before starting any painting project. This article will help you get what you need to do the job well.
- Painting Floors: Painting your floor can make a dramatic statement in any room. Learn how to use paint to showcase your floor.
- Masking Surfaces: This article explains how to tape off windows, trim, and other areas to ensure clean lines between painted surfaces.
Painting Windows
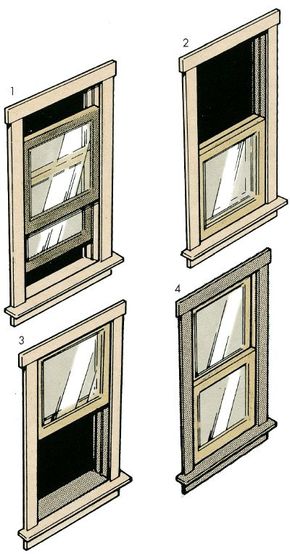
© 2007 Publications International, Ltd Paint double-hung windows in the sequence shown, moving the top and bottom sashes for access to all surfaces.
If you want to make painting windows easier, purchase a 2 or 2.5-inch sash trim brush that is angled slightly across the bottom. This will make it easier to paint 90-degree corners and tight spaces.
When painting wood-frame windows, start by raising the bottom sash more than halfway up and lowering the top sash until its bottom rail is several inches below the bottom sash. Then, paint the bottom rail of the top sash and up the stiles as far as possible. Paint all surfaces of the bottom sash except the top edge. Afterward, switch the position of the sashes, with the top sash up to within an inch of the window frame and the bottom sash down to within an inch of the windowsill. Paint the previously obstructed surfaces of the top sash and the top edges of both sashes. Avoid painting the wood jambs in which the sashes move up and down. Instead, paint the window frame, working from top to bottom, including the sill. Once the paint on the sashes is dry to the touch, lower both sashes as far as they will go and paint the exposed jambs. Allow the paint to dry, raise both sashes all the way up, and paint the lower jambs. To prevent the sashes from sticking in the jambs, apply only enough paint to cover the old coat. After the paint has dried, lubricate the channels with paraffin or a silicone spray.
If you need more information on painting, check out the helpful articles listed in the following unordered list:
– House Painting: Get tips on interior and exterior painting in this home improvement article.
– House Painting Tools: Make sure you have the necessary tools before starting any painting project with this article.
– Painting Shutters: Learn how to paint shutters smoothly and equally from this article.
– Masking Surfaces: Discover how to tape off windows, trim, and other areas to ensure you get clean lines between your painted surfaces in this article.
When painting doors, start with the panels first. Then paint the rails, stiles, and edges, working from top to bottom. Flush doors, which have smooth, flat surfaces, are easy to paint with either a brush or a roller. However, doors with inset panels can be tricky. To avoid lap marks, paint the entire door without stopping. Before starting, remove the doorknobs, the plates behind them, and the latch plate on the edge of the door. For ornate doors, begin by painting the inset panels at the top of the door, then move down from the top to the bottom, painting the top rail, middle rail, and bottom rail with back-and-forth strokes. Next, paint the vertical stiles with up-and-down strokes. If painting both sides of the door, repeat the process. If painting only one side, apply a light coat to the top edge to prevent paint buildup. Finally, paint the hinge edge and latch edge of the door.
Need more information? Check out these useful articles:
- House Painting: Whether you’re painting the interior or exterior of your home, this home improvement article provides helpful tips for a successful project.
- House Painting Tools: Before starting any painting project, make sure you have the necessary tools. This article offers guidance on what you’ll need.
- Painting Trim, Baseboards, and Wainscoting: Learn how to add the perfect finishing touch to your room with this guide to painting trim, baseboards, and wainscoting.
- Painting Windows: Get tips on painting different types of window frames in this article from HowStuffWorks.
Painting Shutters
The best way to paint shutters, whether they’re indoors or outdoors, is to use canned spray paint or an airless power sprayer. However, if that’s not an option, you can still achieve a great finish with a brush.
First, remove the shutters and scrape, sand, and clean them as necessary. If you can, hang them from an open ceiling joist to paint both sides at once. Otherwise, paint one side at a time by standing them upright or laying them flat on the floor.
Use a dry brush to avoid runs and drips, and paint the window side of the shutter first. On adjustable shutters, place a matchstick or wood wedge between the adjusting rod and its staples to keep the rod away from the louvers. Paint the louvers with a 1/2- or 1-inch trim brush, followed by the frame with a 2-inch brush. Finally, paint the edges last, checking for runs and smoothing them out as you go. Let the front dry before painting the back.
Need more information? Check out these useful articles:
- House Painting: Whether you’re painting the interior or exterior of your home, this home improvement article provides helpful tips for a successful project.
- House Painting Tools: Before starting any painting project, make sure you have the necessary tools. This article offers guidance on what you’ll need.
- Painting Windows: Learn how to give your windows a fresh coat of paint with this article from HowStuffWorks.
- Using an Airless Sprayer: For those who prefer spray painting, this page provides tips on how to use an airless sprayer.
Painting Kitchen Cabinets

©2006 Publications International, Ltd. With cabinets, paint in this sequence, starting inside and working out. Paint drawers last.
When considering a kitchen makeover, painting the cabinets can be a cost-effective way to give the room a new look. Start by painting the inside of the cabinets, working your way out. Finish with the drawers for a professional-looking result.
To make painting cabinets and cupboards easier, it is recommended to remove all obstructions such as shelves, drawers, handles, pulls, knobs, and latches. If the hinges on the doors have removable pins, it’s best to take them off until the cabinet and cupboard interiors and surfaces are painted. Painting the barely accessible interior surfaces is the most challenging part. You can shorten the handles on your trim brushes to make it easier. Start by painting the inside back walls, inside top, side walls, and bottoms, tops, and edges of shelves. Then move on to the exterior surfaces, working from the top down. If the doors are still in place, open them and paint the inside surfaces. Close them partway and paint the outside. For the drawers, stand them up on newspapers and paint only their fronts. The exterior sides or bottoms of the drawers should not be painted.
If you’re not satisfied with this article, there are other helpful articles to try, including house painting, house painting tools, painting walls, and painting cleanup.
Painting floors is becoming more common, especially in vacation homes. To paint a small floor, it can take just a couple of hours once everything is prepared. The techniques for painting floors are the same as for painting any other large flat surface. Remove all traces of wax and sand the floor lightly to roughen its surface, improving its paint-holding ability. You can use ordinary porch and deck paint or a good-quality oilbase enamel. In either case, follow up with two to four coats of clear polyurethane to protect the painted finish. Start by removing all furniture from the area, and cut in the paint around the baseboards with a brush. You can use a wide wall brush or a medium-pile roller for the rest of the floor. If you use an extension handle on a roller, you can do the job standing up. Plan on applying at least two coats of paint, then two, three, or four coats of polyurethane. Let each coat dry completely before reentering the room. For masonry floors, painting is easier, faster, less expensive, and more common than painting wood floors. However, moisture is a major cause of masonry painting problems. Most masonry is porous, and water that comes through it pushes at the paint, causing small particles to come off. Paint designed for masonry surfaces can handle rough treatment.
There are various types of masonry paints available, including latex-based options that offer easy application and cleanup. Cement-based paints are commonly used on unpainted concrete in areas with low-pressure moisture, while epoxy paints are ideal for surfaces that require a hard finish to resist moisture and chemicals. It is important to ensure that the paint used is compatible with any existing paint and the type of masonry being covered. Consulting a paint dealer can help in selecting the appropriate coating.
Before painting, it is important to repair and patch any cracks and holes and allow the patch compounds to cure fully. Efflorescence, the whitish powder that appears on concrete, can be removed with a 10% muriatic acid solution. The surface should then be washed with a strong detergent or concrete degreaser and vacuumed to remove any leftover dirt. A long-napped roller fitted with an extension handle can be used for most masonry floors, with a brush for rough areas. Depending on the surface conditions and paint used, a second coat may be required with a recommended waiting time between coats.
If ordinary paint won’t cover up flaws or a more tactile or rustic look is desired, texture painting is a good option. Texture paints specifically designed for this purpose are thick and can be applied with special texturing rollers, a wide brush, a urethane foam brush, or a trowel. The surface should still be cleaned and patched, but texture paints can camouflage most surface blemishes.
Helpful articles on house painting, painting tools, painting trim, baseboards, and wainscoting, and painting safely are also available.
To create a surface design, work on one section at a time using a long-napped texturing roller or a foam brush for a stippled effect. Apply the paint and use a flat brush to pat the surface, creating peaks and valleys. For more unique textures, try using crumpled wax paper, a big sponge, or a coarse brush to create circles or swirls in the paint. Make sure to maintain uniform thickness and texture throughout the sections. When applying grit-textured paint to ceilings, use a special long-napped roller or synthetic-bristle brush as per the instructions on the can.
If you want to paint stripes on walls or furniture, there are a few easy techniques you can use. For medium-wide stripes, use a level to draw two parallel lines on the wall and follow them with masking tape. Use a trim brush to paint between the tape lines and wait for the paint to dry before peeling off the tape. For thin, parallel stripes, use striping tape with removable strips down its length. Again, use a level to create a straight line, follow it with striping tape, and paint over it with a dry brush. Wait for the paint to dry before peeling off the tape.
If you’re looking for more painting tips, check out some of our helpful articles on house painting, painting tools, and painting stencils.
Need different information? Check out these useful articles:
- House Painting: Get valuable advice on interior and exterior painting for your home improvement project.
- House Painting Tools: Make sure you have the right tools before starting any painting project with help from this article.
- Painting Textures: Learn tips for using texture painting to hide flaws in your home’s surfaces.
- Painting Stencils: Discover the simple steps for designing and painting with stencils in this article.
Painting with Stencils
Stenciling is one of the oldest and easiest ways to add decorative patterns to walls, ceilings, floors, and other surfaces. Stencils are like the reverse of a coloring book page, with cut-out spaces where the pattern will be painted. Reusable stencils made of plastic or heavy paper are available at art supply and paint stores.
You can also create your own stencils with thin cardboard. Draw your design on tracing paper, transfer it to cardboard, and cut it out. To apply the pattern to your wall, tape the stencil in place and use a stenciling brush to apply paint. Use a dabbing motion rather than brushing to avoid forcing paint under the edges of the stencil. Let the paint dry before removing the stencil and moving to the next area.
If you want to use the same pattern repeatedly, it’s helpful to have multiple stencils on hand. If your stencil requires multiple colors, paint each color separately and wait for the paint to dry before adding the next color. Plastic stencils can be washed and reused, while those made of paper or cardboard will eventually weaken and need to be replaced.
Need more information? Check out these helpful articles:
- House Painting: Get tips and tricks for both interior and exterior painting in this home improvement article.
- House Painting Tools: Ensure you have all the necessary tools for your painting project with this helpful article.
- Painting Textures: Add character to your walls by learning how to apply textures in this article.
- Painting Stripes: Elevate your home decor with this decorative painting technique. Learn more in this article.
Painting Cleanup
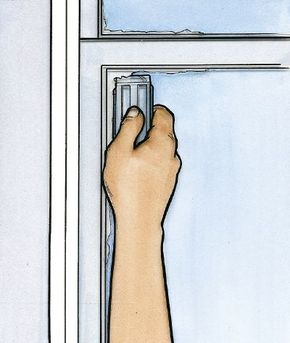
© 2007 Publications International, Ltd. Use a razor blade scraper to remove dry paint from glass. Be careful not to break the seal between the paint and windowpane.
Keeping things clean while painting is essential for a successful paint job. Remember to clean your equipment immediately after use and wipe up any spills or drips as soon as possible. Here are some tips to help you keep things clean while painting.
Preventing Drips and Spatters
Avoid bumping the roller into walls or ceilings, even if you’re using the same paint color on both surfaces. This can cause visible ridges of paint to accumulate.
Rollers will emit a fine spray of paint, even with slow and steady movements. Protect your floors and furniture with drop cloths and wear a scarf or cap to prevent paint from getting on your hair or skin. Canvas drop cloths are durable and reusable, but plastic drop cloths are a more affordable option.
When painting around windows, doors, or woodwork, consider using a paint shield to minimize the risk of spatters. These can be purchased or made from materials such as thin cardboard or old venetian blind slats. Hold the shield perpendicular to the surface being painted and apply the paint with your other hand. Paint shields are especially useful for painting window frames as they can prevent paint from getting on the glass.
Spills and drips are inevitable, so keep a moist sponge and pail of water nearby when using latex paints. If using solvent-thinned paint, have some thinner and rags on hand to wipe up spills and drips before they dry.
Cleaning Up
Clean up paint drips and spills while they’re still wet for easy removal. For dried paint, use a razor blade scraper to remove it from glass surfaces, being careful not to break the seal between the paint and windowpane.
If you’ve used masking tape around windows while painting, it’s important to remove it immediately after painting to prevent it from pulling off any of the newly applied paint. If you’ve painted freehand or with a painting shield, it’s likely that there will be some drops or smudges on the glass. To remove these, a razor blade scraper can be used to easily scrape off the paint. When cleaning up ragged edges around the sash, it’s important to avoid breaking the seal between the new paint and the windowpane.
Cleaning up drips and spatters on most other surfaces is easier and less time-consuming. For latex paint, a soft cloth combined with household detergent and warm water should suffice. However, it’s important not to scrub a freshly painted surface, even if it’s dry to the touch, as many paints don’t cure for 30 days or more. For solvent-thinned paints, a soft cloth and turpentine or mineral spirits can be used to soften and remove dried-on paint droplets, followed by warm water and detergent.
To remove paint drips on hardwood, ceramic tile, or resilient flooring, a cloth wrapped around a putty knife can be used to gently scrape them up. The area can then be washed with warm, soapy water, but solvent should be avoided as it can damage the finish on the floor.
When it comes to cleaning painting equipment, it’s important to clean brushes, rollers, reusable drop cloths, paint cans, containers, and roller pans immediately after use. Fresh paint comes out of the equipment easily, but leaving it to dry will make cleaning much more difficult and time-consuming. Inexpensive roller covers don’t respond well to cleaning, so it’s best to buy a new one for each job. However, investing in a professional quality roller cover will ensure thorough cleaning and reusability.
If you have used latex paint, remove most of the paint by dragging the brushes across the lip of the paint can. Then, rinse the brushes and rollers under warm tap water and clean them with dishwashing detergent. To remove any remaining paint residue from the bristles, use a paintbrush comb. You can gently squeeze the bristles or flick the brush outside to get rid of excess water. Squeeze the water out of the roller covers and use paper towels to soak up any remaining water from both brushes and rollers.
For solvent-thinned paints, use the appropriate solvent identified on the paint can label. Put the brushes and rollers into a container of the solvent and agitate them. Repeat the process until all the paint is removed. After that, pour the solvent into an old coffee can to clean the brushes and use an inexpensive aluminum foil loaf pan or a clean roller pan for rollers. Solvents are toxic and flammable, so make sure to work in a well-ventilated area away from any heat sources or flammable objects. Use paper towels to blot out excess solvent from the brushes and rollers and wash them with warm soapy water. Hang the brushes until they dry and set roller covers on end.
Clean the roller pans and paint containers by wiping them out, washing them, and drying them afterwards. Wipe off the lips of paint cans and hammer down the lids to preserve leftover paint. Store paint and solvent cans in a safe place away from extreme heat or cold and out of reach of children. If you have less than a quart of paint left, store it in a tightly capped glass jar for touch-ups. Wrap cleaned and dried brushes and rollers before storing them away. Brushes can go back into their original plastic or paper packages or can be wrapped in aluminum foil. Rollers can be wrapped in kraft paper, foil, or perforated plastic sandwich bags.
To clean reusable drop cloths made of heavy-duty plastic or canvas, wipe off major paint splotches with soap, water, and paper towels. Do not use solvent on drop cloths as it may cause them to dissolve. Let them dry completely, fold them up, and store them with your other equipment for the next project.
If you need more information on this topic, check out some of these helpful articles: House Painting, House Painting Tools, Painting Cleanup, and How to Paint Safely.
FAQ
1. What are some popular colors for painting interiors?
Some popular colors for painting interiors include neutral shades such as beige, gray, and white. These colors are versatile and can match with a variety of decor styles. Other popular choices include blues, greens, and yellows, which can add a pop of color to a room and create a calming atmosphere. It’s important to choose colors that complement the purpose of the room and the overall mood you want to create.
2. Should I choose a matte or glossy finish for my interior walls?
It depends on personal preference and the purpose of the room. Matte finishes are great for hiding imperfections on walls and create a more muted, subtle look. Glossy finishes are more reflective and can make a room appear brighter and more vibrant. However, glossy finishes may also highlight imperfections on walls. Consider the amount of natural light in the room and the overall decor style when choosing between matte and glossy finishes.
3. How can I prep my walls before painting?
Before painting, it’s important to clean the walls thoroughly to remove any dirt, dust, or grease. Fill in any holes or cracks with spackle and sand them down until they are smooth. Tape off any areas that you don’t want to paint, such as baseboards or trim. It’s also a good idea to prime the walls to ensure an even paint application and better adhesion of the paint.
4. How many coats of paint should I apply?
It’s typically recommended to apply two coats of paint for the best results. This ensures even coverage and a smooth finish. However, if the color you are painting over is significantly darker or if you are painting a lighter color over a dark color, you may need to apply a third coat for full coverage.
5. Should I use a paintbrush or a roller to paint my walls?
Both paintbrushes and rollers have their advantages and disadvantages. Paintbrushes are great for cutting in around edges and corners and creating a precise, detailed finish. Rollers are better for covering larger areas quickly and efficiently. It’s best to use a combination of both tools when painting walls. Use a paintbrush to cut in around edges and corners, then use a roller to cover larger areas with paint.
6. How long does it take for paint to dry?
The drying time for paint can vary depending on the type of paint, humidity, and temperature. Generally, latex paint can take anywhere from 2-4 hours to dry, while oil-based paint can take up to 24 hours to dry completely. It’s important to wait until the paint is fully dry before applying additional coats or touching up any areas.
7. Can I paint over wallpaper?
In some cases, it is possible to paint over wallpaper. However, it’s important to ensure that the wallpaper is in good condition and securely attached to the wall. If the wallpaper is peeling or damaged, it may need to be removed before painting. If you do choose to paint over wallpaper, it’s best to prime the wallpaper first to ensure better adhesion of the paint.

Brody is a skilled craftsman and gardening expert. From renovating living spaces to cultivating lush gardens, Brody’s knowledge and passion shine through, inspiring readers to embark on their own home improvement and gardening journeys with confidence.


Leave a Reply