
Home Improvement
When it comes to painting a room, preparation is key. Therefore, it’s important to have a good understanding of interior painting preparation before beginning a project.
The links below provide information on repairing common surface flaws and cleaning surfaces in preparation for painting.
When painting over a previously painted surface, check for rough, peeling, or chipped areas. Remove all furniture from the room if possible. If not, cover it and the floors with drop cloths, and remove draperies and hardware. Loosen light fixtures and wrap them in plastic bags. Remove wall plates from electrical outlets and switches and paint them separately.
Other topics covered in interior painting preparation include repairing popped nails, small and large drywall holes, cracked plaster, and scrubbing and sanding surfaces. Scraping and masking surfaces are also covered.
For more information on painting and home improvement, see:
- Interior Paints: Find out which type of interior paint is right for your project.
- Painting Interiors: Learn the basics of painting the inside of your house.
- Room Painting Techniques: Tips for painting like a pro.
- House Painting: All things related to improving your home with paint.
- Home Improvement: Make other fixes in all parts of your home.
Repairing Popped Nails
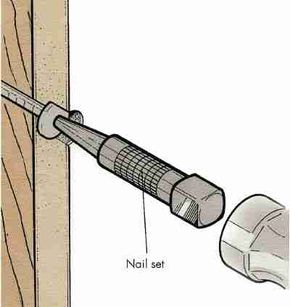
Before painting, surface flaws need to be fixed. If you have a nail coming out of the surface, fix it before painting by driving it into the stud with a nail set.
First, if there are any nails sticking out and accessible, remove them with a hammer and claw. To redrive them, place a nail set over the nail head and hammer it into the stud. Drywall screws can be handled similarly. If the head has separated from the shaft, carefully dig it out and remove it.
Next, to secure the nail in place and relieve pressure, or to replace the holding power of the screw head, drive another nail or screw about 2 inches above or below the old one. Make sure it is flush with the wall and use a light hammer whack to “dimple” the drywall’s surface around the head. Drywall screws will countersink themselves.
Now, with a putty knife, cover the new nail/screw head and fill the hole over the old one with spackling compound. Allow it to dry and then lightly sand the area. Repeat the process once or twice more if necessary, since spackling compound shrinks as it dries. Finally, touch up the patches with paint or primer.
If you need further assistance, check out these helpful articles:
- House Painting: Get tips on interior and exterior painting for your house in this home improvement article.
- House Painting Tools: Make sure you have all the necessary tools before starting any painting project.
- Repairing Small Drywall Holes: Learn how to fill small drywall holes.
- Repairing Large Drywall Holes: Discover how to replace a section of drywall for larger holes.
Here are the tools you’ll need for this drywall repair:
- Hammer or screwdriver
- Nail set
- Drywall nails or screws
- Putty knife
- Spackling compound
- Sandpaper
- Paint or primer
- Paintbrushes
Repairing Small Drywall Holes

©2007 Publications International, Ltd. Repairing a drywall hole involves the inventive use of the lid from a tin can.
Although drywall is durable, it can only withstand so much damage. A door slammed too hard can create holes in the wall. Simply painting over these holes won’t hide the problem for long.
Luckily, even large holes can be easily fixed. A drywall repair kit can be purchased from your local hardware store or home improvement center. Before using the kit, remove any loose paper or plaster around the hole’s edges. Then apply the drywall patch according to the manufacturer’s instructions.
This article will explain how to fix small and large drywall holes, starting with small holes.
Fixing a Small Drywall Hole
The fourth step involves using a putty knife to apply premixed drywall patching compound in accordance with the manufacturer’s instructions. It is recommended to avoid using spackling compound as it shrinks while drying. A thick paste can be made by mixing plaster of paris with water. The hole should be packed with the compound or plaster against the backing and behind the stick. The compound should be kept inside the hole, cover the backing, and fill slits, but should not be spread on the wall surface. Leave the patch slightly low and do not attempt to level it. The patch should be left to dry for at least 24 hours until it turns bright white. Once dry, the string or wire can be cut and the stick removed.
The fifth step involves filling the patch completely with more plaster of paris or drywall patching compound to make it level with the wall surface. Let it dry, lightly sand the area, prime, and paint to finish the patch.
The next section covers how to fix a larger hole in drywall.
Not what you’re looking for? Try these helpful articles:
- House Painting: Gather helpful tips on both interior and exterior painting in this home improvement article.
- House Painting Tools: Make sure you have the tools you’ll need to do the job well before taking on any painting project.
- Repairing Large Drywall Holes: Learn how to replace a section of drywall with these tips.
- Repairing Popped Nails: Fix another common problem with drywall—popped nails—with this helpful article.
What You’ll Need
- Clean tin can lid
- Tape measure
- Keyhole saw
- Awl
- Thin wire or string
- Scissors or wire cutters
- Scrap wood
- Putty knife
- Drywall patching compound
- Sandpaper
- Primer and paint
- Paintbrushes
Repairing Large Drywall Holes
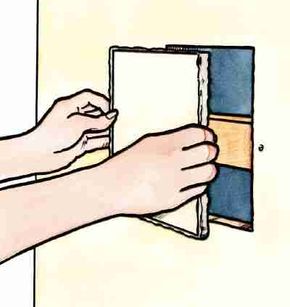
©2007 Publications International, Ltd. Secure a backing board on the inside of the wall to brace the patch.
If a wall has a large hole or section that is damaged by water or other causes, it can be fixed without a drywall repair kit. The third step involves using spackling compound or wallboard joint compound as glue to hold the patch in place. Spread the compound on the back of the drywall patch and around the edges. Set the patch into the hole and adjust it to be even with the surrounding wall. Hold it in place until the compound begins to set. Allow the compound to dry for at least overnight. The fourth step involves filling the patch outline and covering the exposed screw heads with spackling or joint compound. Let it dry, lightly sand the area, prime, and paint to finish the patch.
Need more help with house painting? Check out these articles:
- House Painting: Whether you’re painting inside or outside your home, get expert tips from this home improvement article.
- House Painting Tools: Before you start painting, make sure you have the right tools. Learn what you need with this helpful guide.
- Fixing Small Drywall Holes: Get a smooth surface before you paint by following these steps to fill small holes in drywall.
- Preparing Surfaces for Painting: Learn about the essential steps to prepare surfaces for painting in this guide from HowStuffWorks.
What You’ll Need
To repair a large drywall hole, you’ll need:
- A scrap piece of drywall
- A utility knife
- A pencil
- A keyhole saw
- A small board
- Flathead screws
- A screwdriver
- Spackling or wallboard joint compound
- A putty knife
- Sandpaper
- Primer and paint
- Paintbrushes
Read More
How to Repair Cracked Plaster
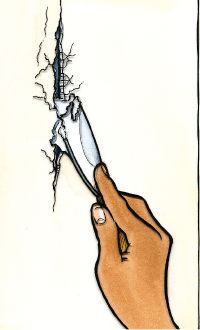
Sometimes you need to make a crack in plaster bigger before you can fix it properly.
Older homes often have walls made of lath and plaster. While plaster is a durable and attractive surface, it tends to develop cracks over time.
Latex paint can temporarily hide hairline cracks in plaster, but small cracks have a way of reappearing. To fix them properly, it’s often necessary to make the crack larger. This may seem counterintuitive, but it’s actually easier to fix a bigger crack than a smaller one. Use plaster of paris or premixed plaster repair compound to fix larger cracks in plaster with these steps:
Step 1: Cut away loose plaster with a utility knife, making the opening wider and cleaner. Remove debris, being careful not to damage the surrounding surface. Clean the area with a vacuum cleaner.
Step 2: Mix plaster of paris with water to make a thick paste. Wet the crack with a paintbrush dipped in water, then pack the plaster into the crack. Smooth the surface with a scraper or trowel. Let the patch dry for at least 24 hours.
Step 3: Lightly sand the patch with medium- or fine-grade sandpaper wrapped around a wood block. If the crack was wide, repeat the process to make the surface smooth, wetting the area each time. Let the patch dry for at least 24 hours after the final coat of plaster.
Step 4: Lightly sand the patch again, then prime it with a thinned coat of paint or primer. Once the primer is dry, paint the entire wall.
Need more painting advice? Check out these helpful articles:
Looking to tackle a house painting project? Check out this home improvement article for helpful tips on both interior and exterior painting. Before starting any painting project, make sure you have all the necessary tools. This article will provide you with a list of tools you’ll need to do the job well. If you need to repair small or large drywall holes, we’ve got you covered with tips on how to fill them.
If you’re painting over a previously painted surface, it’s important to prepare the surface properly. Look for rough, peeling, or chipped areas and fix them before starting to paint. It’s recommended to remove all furniture from the room, but if that’s not possible, cluster it in one area and cover it with drop cloths. Take down draperies and drapery hardware, and loosen light fixtures. Remove the wall plates from electrical outlets and switches.
After fixing any flaws, wash down the surfaces to be painted with warm water and a good household detergent or wall-cleaning soap to remove soot, grease, cigarette smoke, and airborne dirt. Use a slightly damp sponge to go over a vertical strip of wall about 2 feet wide, then rinse the sponge in clean water and repeat the process until the wall is clean. This may seem tedious, but it’s an important step to ensure a good surface for a new coat of paint.
The tools you’ll need for repairing cracked plaster include a utility knife, vacuum cleaner, plaster of paris or premixed plaster repair compound, paintbrushes, scraper or trowel, wood block, medium- or fine-grade sandpaper, primer, and paint.
For more information on preparing surfaces for painting, read on about scrubbing and sanding surfaces.
When painting, it is not advisable to paint over a glossy surface, even if it is clean, as the paint will not adhere. Instead, use trisodium phosphate (TSP) to reduce the gloss on the entire wall. TSP can be found at hardware or paint stores and should be mixed with hot water until no more will dissolve. Apply the solution to the wall, sponge it dry, rinse with clear water, and sponge it dry again. If TSP is not available, you can use a commercial deglosser instead. For woodwork, you can use a deglossing solution or sand it lightly with medium- or fine-grade sandpaper. Before painting, remove accumulations of floor wax or acrylic floor finish from baseboards with a wax or finish remover.
If you live in an older home, you may need to scrape areas where the previous paint job has begun to peel or crack. Gently scrape loose particles and sand the area smooth to blend it with the surrounding area. If you get down to bare wood, prime the spots before applying the final coat of paint. For walls, if it is impossible to blend the scraped and nonscraped areas, apply a light coat of drywall joint compound, sand it smooth, prime, and paint.
For more helpful articles on house painting, check out the provided links.
Need more painting tips? Check out these helpful articles:
- House Painting: Ready to take on a house painting project? Get tips for both interior and exterior painting in this home improvement article.
- House Painting Tools: Make sure you have all the tools you need for a successful painting project by reading this article.
- Painting Interiors: Learn the ins and outs of painting walls, doors, and everything in between with this helpful guide.
- Scrubbing and Sanding Surfaces: Proper preparation is key to a successful painting project. Learn about necessary prep steps in this article.
How to Mask Surfaces for Painting
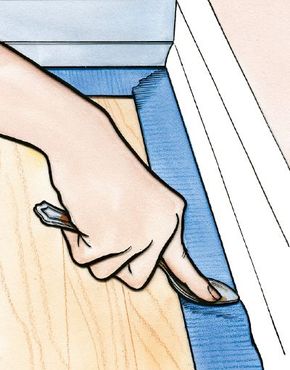
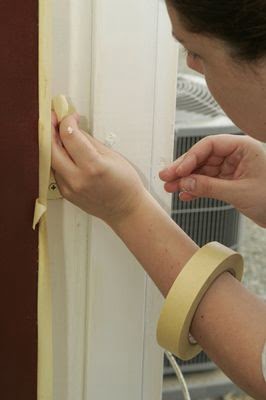
© 2007 Publications International, Ltd. To prevent paint from bleeding under painter’s tape, use a spoon to press the tape firmly against the surface.
When painting two different colors on a single surface, it can be difficult to keep a straight line. To achieve a clean edge, use a carpenter’s level and pencil to mark a faint line on the wall. Then, align masking tape with the line and press it onto the wall a little at a time, using your thumb. Be careful not to pull the tape too tightly or it may stretch or retract. To prevent paint from bleeding under the tape, use a spoon to press it firmly against the surface.
Remove the tape before the paint is completely dry to avoid damaging the surface. With latex paint, wait about 30 minutes before removing the tape. With alkyds, wait two or three hours. Check the paint can label for specific drying times.
Masking tape is also useful for protecting trim around doors, windows, baseboards, and bookshelves. It allows you to paint quickly and without worrying about getting paint on the trim.
Need more painting tips? Check out these helpful articles:
- House Painting: Ready to take on a house painting project? Get tips for both interior and exterior painting in this home improvement article.
- House Painting Tools: Make sure you have all the tools you need for a successful painting project by reading this article.
- Painting Interiors: Learn the ins and outs of painting walls, doors, and everything in between with this helpful guide.
- Painting Trim, Baseboards, and Wainscoting: Brush up on techniques for painting all the potential “extras” in a room, only at HowStuffWorks.
FAQ
1. What should I do before painting my interior walls?
Before painting your interior walls, you should clean them thoroughly to remove any dirt or dust. You should also patch any holes or cracks in the walls and sand them down. Additionally, you may need to apply a coat of primer to ensure that the paint adheres properly.
2. How do I choose the right paint color for my interior walls?
When choosing a paint color for your interior walls, consider the overall style and color scheme of your home. You should also take into account the amount of natural light in the room and the mood you want to create. It may be helpful to test out different paint samples on a small area of the wall before committing to a color.
3. Do I need to use a specific type of paint for my interior walls?
It is important to choose a paint that is specifically formulated for interior walls. These paints are designed to withstand wear and tear and are easy to clean. Additionally, they often contain low levels of volatile organic compounds (VOCs) which can be harmful to your health.
4. How do I properly prepare my walls for painting?
To properly prepare your walls for painting, you should start by cleaning them thoroughly and patching any holes or cracks. You may also need to sand down rough or uneven areas. After this, you should apply a coat of primer to ensure that the paint adheres properly.
5. Can I paint over wallpaper?
It is possible to paint over wallpaper, but it is not recommended. The wallpaper may start to peel or bubble after it is painted, and it can be difficult to remove later on. It is best to remove the wallpaper before painting.
6. How many coats of paint should I apply to my walls?
The number of coats of paint you should apply to your walls depends on the color and type of paint you are using. In general, two coats of paint are recommended to ensure even coverage and a consistent finish.
7. Do I need to use a specific type of brush or roller?
It is important to use the right type of brush or roller for the type of paint you are using and the texture of your walls. For example, a thick nap roller is best for textured walls, while a smooth roller is better for smoother walls.
8. How do I prevent paint from getting on my ceiling or trim?
To prevent paint from getting on your ceiling or trim, you should use painter’s tape to mask off these areas before painting. Additionally, you should use a steady hand and take your time to ensure that the paint goes where you want it to.
9. How long does it take for paint to dry?
The drying time for paint depends on the type of paint, the temperature and humidity of the room, and the thickness of the coat applied. In general, most paints will dry to the touch within an hour or two, but may take several hours or even days to fully cure.
10. Can I paint my walls if they are wet?
No, it is not recommended to paint wet walls. The moisture can prevent the paint from adhering properly and may cause the paint to bubble or peel over time. You should wait until the walls are completely dry before painting.
11. How do I clean up after painting?
To clean up after painting, you should first remove any painter’s tape and plastic sheeting. You should then clean your brushes and rollers with soap and water or the appropriate solvent. Additionally, you should dispose of any empty paint cans or other materials according to your local regulations.

Brody is a skilled craftsman and gardening expert. From renovating living spaces to cultivating lush gardens, Brody’s knowledge and passion shine through, inspiring readers to embark on their own home improvement and gardening journeys with confidence.


Leave a Reply